Data source configuration in JBoss AS 7 is different from that in the older versions. Please follow instructions below to create the data source in JBoss AS 7 (or refer to the Web site http://community.jboss.org/wiki/DataSourceConfigurationInAS7).
The following section will take one database type (ASA/SQL Anywhere database with Sybase jConnect JDBC driver) as an example to show you how to create a data source for JBoss AS 7, you can later create data sources for other database types by taking the same steps below but specifying different parameters according to Data source parameters.
You need to perform two main tasks to define a data source in JBoss AS 7. First, you must make the JDBC driver available to the application server; then you need to configure the data source.
Step 1: Go to the "modules\com" directory under the root directory of the JBoss application server (e.g. jboss-as-7.1.1.Final\modules\com), create a "asa" subdirectory and a "asa\main" subdirectory, so the directory looks like the following: jboss-as-7.1.1.Final\modules\com\asa\main.
Step 2: Go to the "main" directory, paste the driver JAR file there, in this example, the jconn3.jar file.
Step 3: Go to the "main" directory, create a module.xml file, and define the file as follows.
<?xml version="1.0" encoding="UTF-8"?>
<module xmlns="urn:jboss:module:1.0" name="com.asa">
  <resources>
    <resource-root path="jconn3.jar"/>
        <!-- Insert resources here -->
  </resources>
  <dependencies>
    <module name="javax.api"/>
  </dependencies>
</module>
As you can see from above, in this example, set the module name to com.asa, which matches the directory structure you had created under the "modules" directory. Set resource-root path to the JAR file name, the path appears to be relative, and default to the "main" directory under the directory structure you created, which is "com/asa" in this example.
Finally, define any dependencies you might have. In this case, as the case with all JDBC data sources, we would be dependent on the Java JDBC API's, which in this case in defined in another module called javax.api, which you can find under modules/javax/api/main as you would expect.
-
Under the same directory as the jconn3.jar file, create a "META-INF" subdirectory and a "META-INF\services" subdirectory.
-
Under the "META-INF\services" directory, create a java.sql.Driver file which contains one line - the fully-qualified class name of the JDBC driver, in this example, com.sybase.jdbc3.jdbc.SybDriver.
-
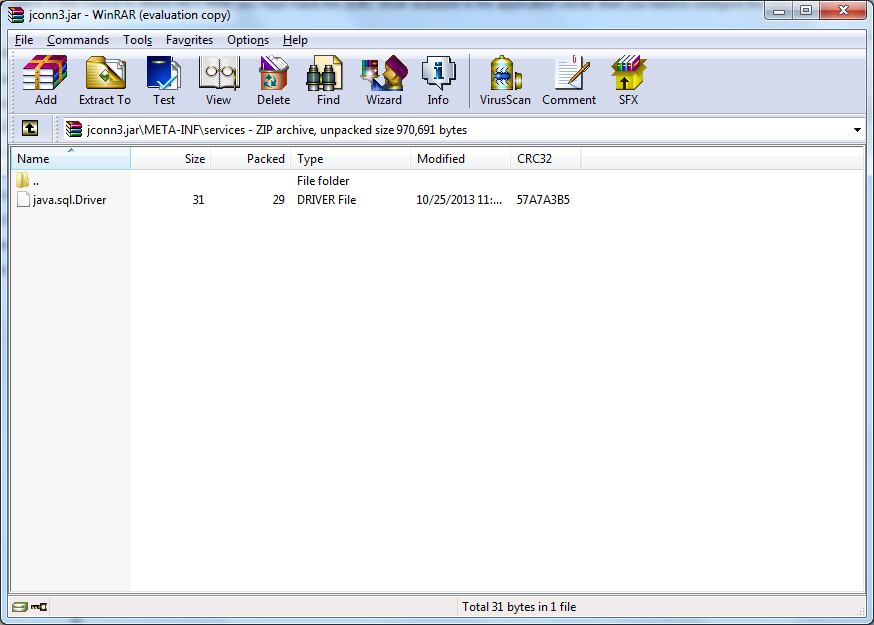
Execute the "jar" command to update the JAR file: "jar -uf jconn3.jar META-INF/services/java.sql.Driver". You can also use WinRAR tool to add the java.sql.Driver file to the "MEAT-INF\services" directory in the jconn3.jar, as shown in the following figure.
Step 5: Open the standalone.xml file under the <jboss_installation_root>\standalone\configuration folder, find the related datasource, and then add the prefix "java:/" to the jndi-name value if there is not such prefix in it, as shown in the following sample code.
<datasources>
      <datasource jndi-name="java:/AppeonSample" pool-name="AppeonSample" enabled="true" jta="true" use-java-context="true" use-ccm="true">
          <connection-url>jdbc:sybase:Tds:192.0.3.150:2638/AppeonSample
          </connection-url>
                 <driver>jconn3.jar</driver>
                  <security>
                           <user-name>dba</user-name>
                           <password>sql</password>
                  </security>
      </datasource>
<drivers>
     <driver name="jconnect3" module="com.asa">
               <driver-class>com.sybase.jdbc3.SybDriver</driver-class>
     </driver>
Step 1: To directly access the Management Console, point your browser at: http://localhost:8080/ or http://127.0.0.1:8080/. If you want to access the console via LAN or WAN, you can modify the standalone.xml to add a new interface. For example:
<interfaces>
        <interface name="management">
            <inet-address value="127.0.0.1"/>
        </interface>
        <interface name="public">
           <inet-address value="127.0.0.1"/>
        </interface>

       <!-- Equivalent of -b 0.0.0.0 -->
          <interface name="any">
            <any-address/>
          </interface>
    </interfaces>
And use this new interface in the socket-binding-group:
<!-- Use the "any" interface -->
<socket-binding-group name="standard-sockets" default-interface="any">
        <socket-binding name="http" port="8080"/>
        <socket-binding name="https" port="8443"/>
        <socket-binding name="jmx-connector-registry" port="1090"/>
        <socket-binding name="jmx-connector-server" port="1091"/>
        <socket-binding name="jndi" port="1099"/>
        <socket-binding name="osgi-http" port="8090"/>
        <socket-binding name="remoting" port="4447"/>
        <socket-binding name="txn-recovery-environment" port="4712"/>
        <socket-binding name="txn-status-manager" port="4713"/>
    </socket-binding-group>
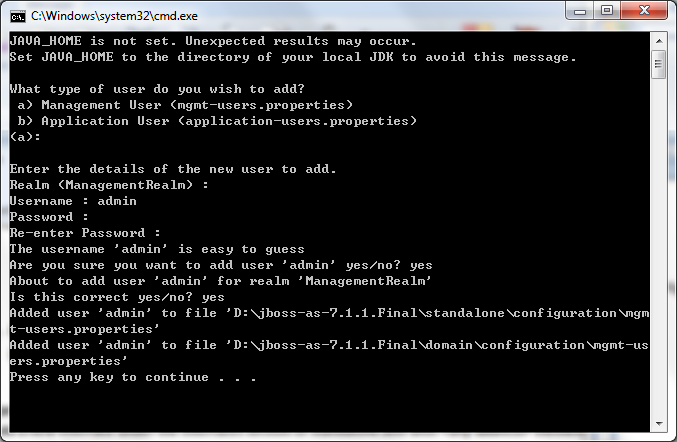
Step 2: If you have not yet added at least one management user, an error page will be displayed asking you to add a new user. You can run the add-user.bat (add-user.sh for Linux) in the jboss-as-7.1.1.Final\bin folder. For details, please refer to the Managing your JBoss Application Server 7 | Authentication section at https://docs.jboss.org/author/display/AS71/Getting+Started+Guide.
Step 3: Log on to the JBoss AS Administration Console, as shown in figure below.

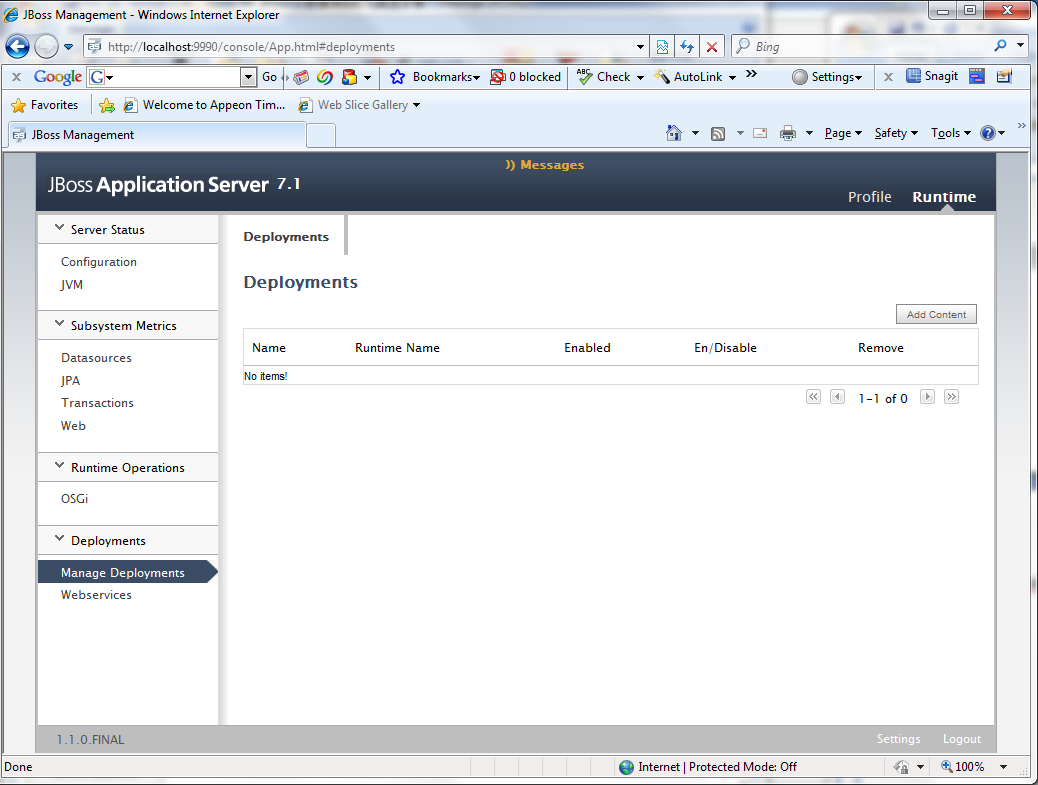
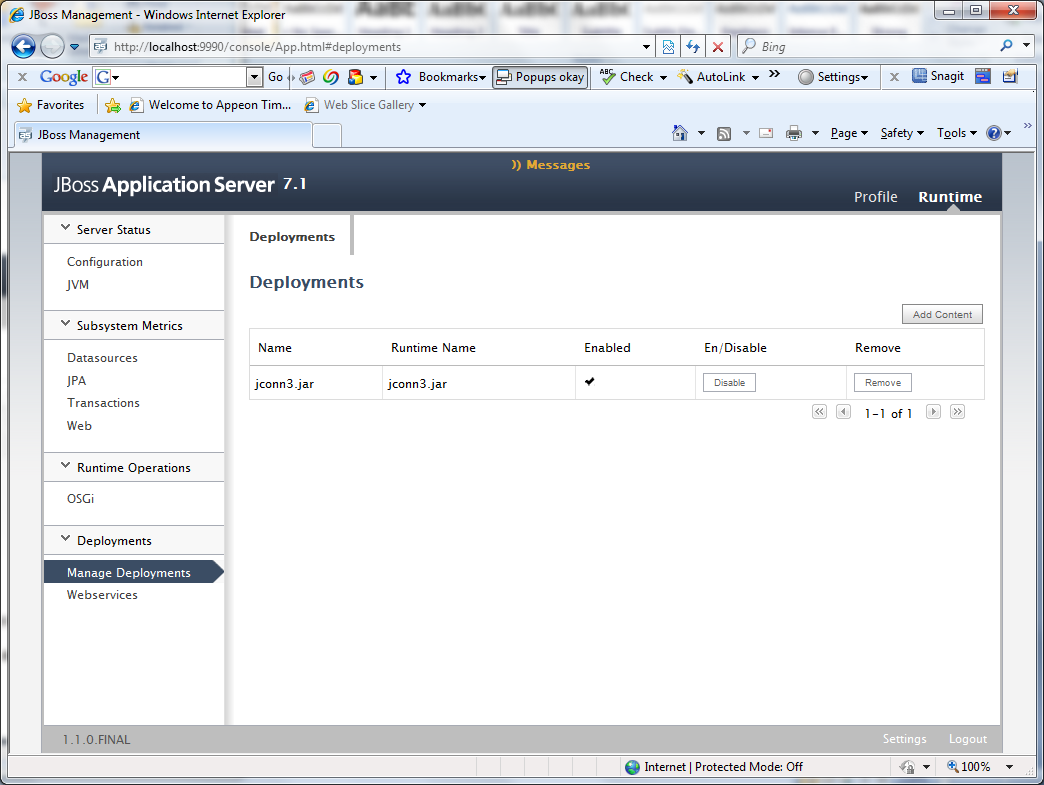
Step 4: Click Deployments > Manage Deployments, as shown in figure below.
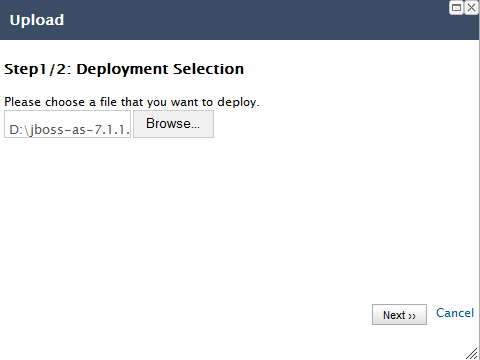
Step 5: Modify the JAR file, refer to Step 4 in "Installing a JDBC driver via the configuration file" for details. Click Add Content to deploy this .jar file.
-
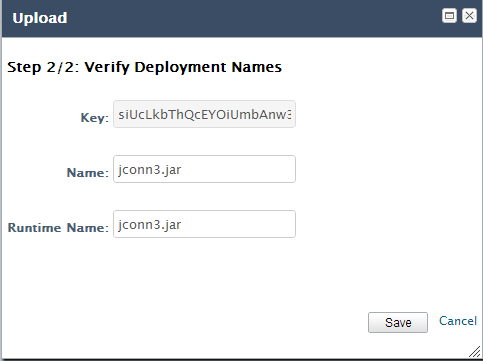
Upload the jconn3.jar, and click Next >>.
-
Verify the deployment names and click Save.
Step 6: Click Enable to enable the jconn3.jar, as shown in the following figure.
Step 7: Set up the target database as a service, and start the service SQLAnywhere-appeonsample by inputting the following command lines in the sqlAnywhere.bat:
"C:\Program Files\SQL Anywhere 12\Bin32\dbsrv12.exe" -x tcpip(port=2698) -n duanserv2 "D:\jboss711-hsqldb-2\AppeonSample.db".
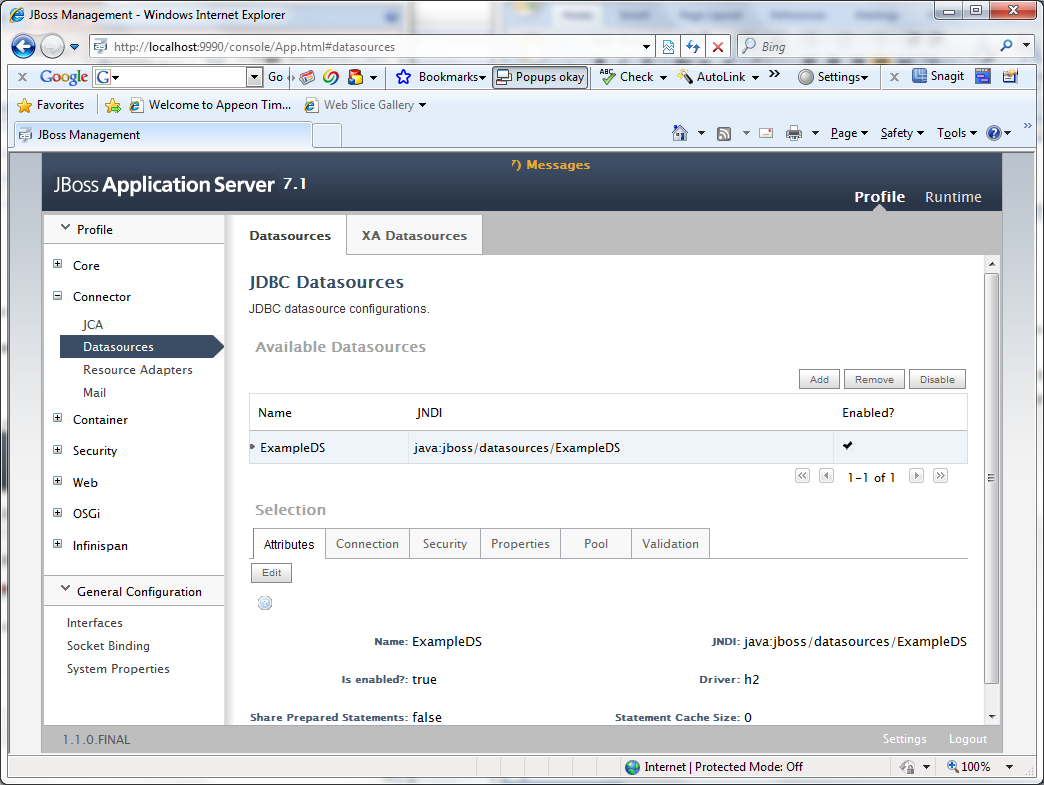
Step 8: Switch to the Profile tab, and click Add to create a new datasource, as shown in the following figure.
-
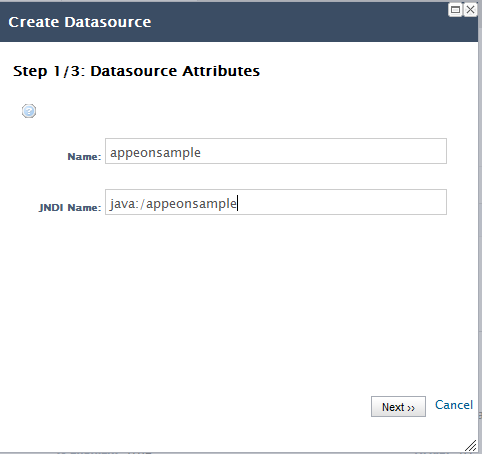
Input any text as the data source name and the JNDI name. For example, "java:jboss/appeonsample". The JNDI name will be used as the data source name in AEM. Click Next.
-
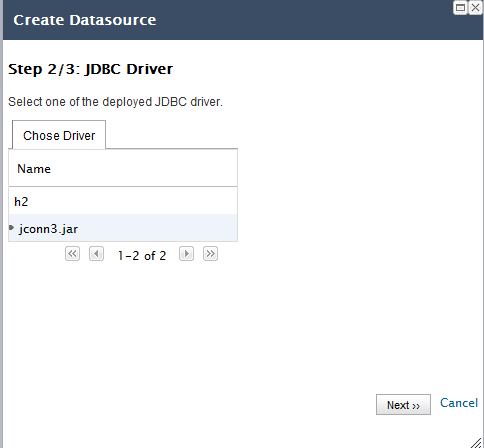
Select the JDBC driver, in this example, com.asa. Click Next.
-
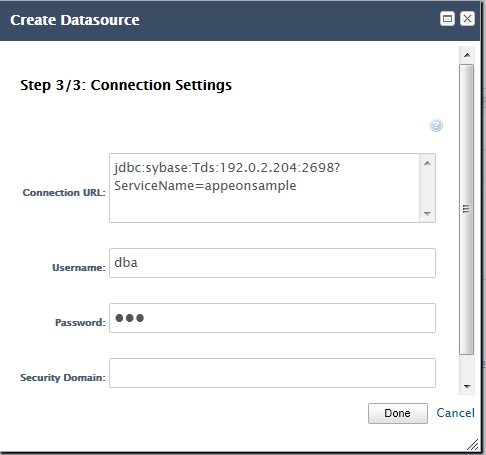
Specify the connection information and click Done.
The following table describes how to specify the connection information for Sybase ASA/SQL Anywhere databases. The values are different according to database types. You can refer to Data source parameters.
Table 24. Connection properties
Connection URL
For example, jdbc:sybase:Tds:192.0.2.204:2698?ServiceName=appeonsample
Username
Type the database login username. The username is set on the database server.
Password
Type the database login password. The password is set on the database server.
Step 9: After the data source is created successfully, you will be redirected to the Datasources page and you will be able to see the new data source in the list.

The following section will take one database type (Oracle database with Oracle JDBC driver) as an example to show you how to create a data source for JBoss 5, you can later create data sources for other database types by taking the same steps below but specifying different parameters according to Data source parameters.
Detailed steps are as below:
Step 1: Start JBoss AS 5 and log on to the JBoss AS Administration Console.
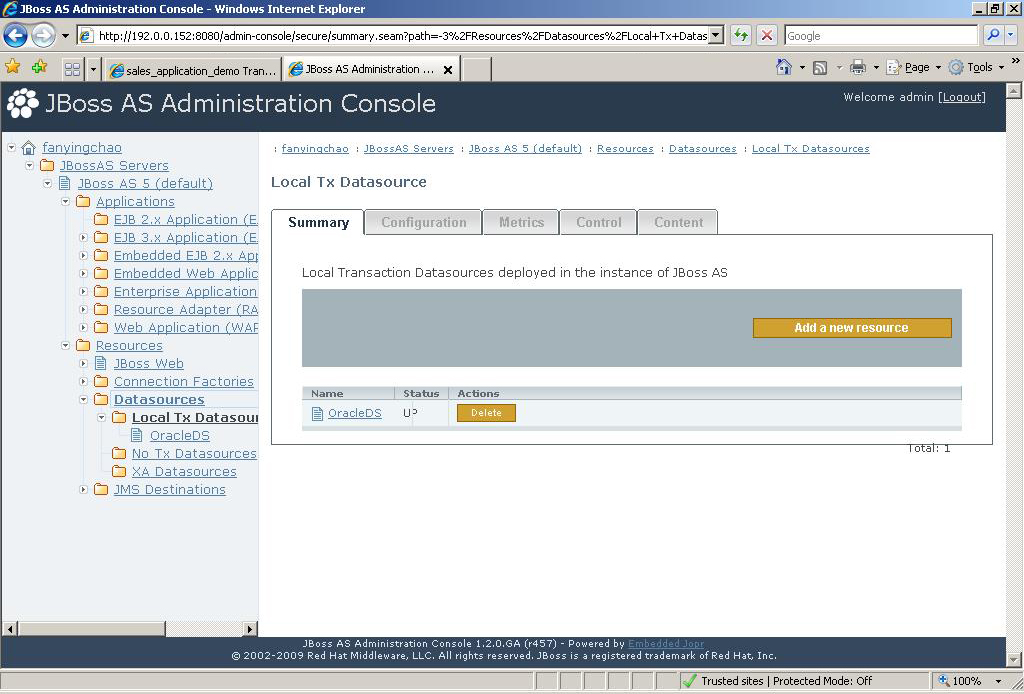
Step 2: Click Resources > Datasources > Local Tx Datasources, as shown in figure below.
Step 3: Click Add a new resource.
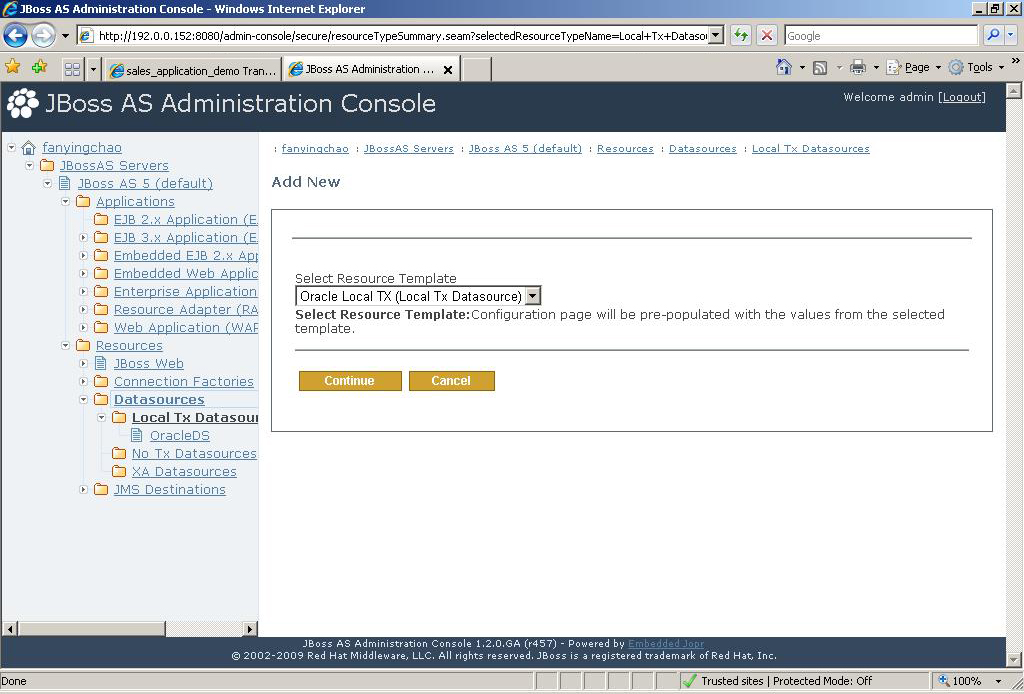
Step 4: In the Resource Template, select Oracle Local Tx and then click Continue.
If you are using other type of database, please select default.
Step 5: Specify the connection information and click Save.
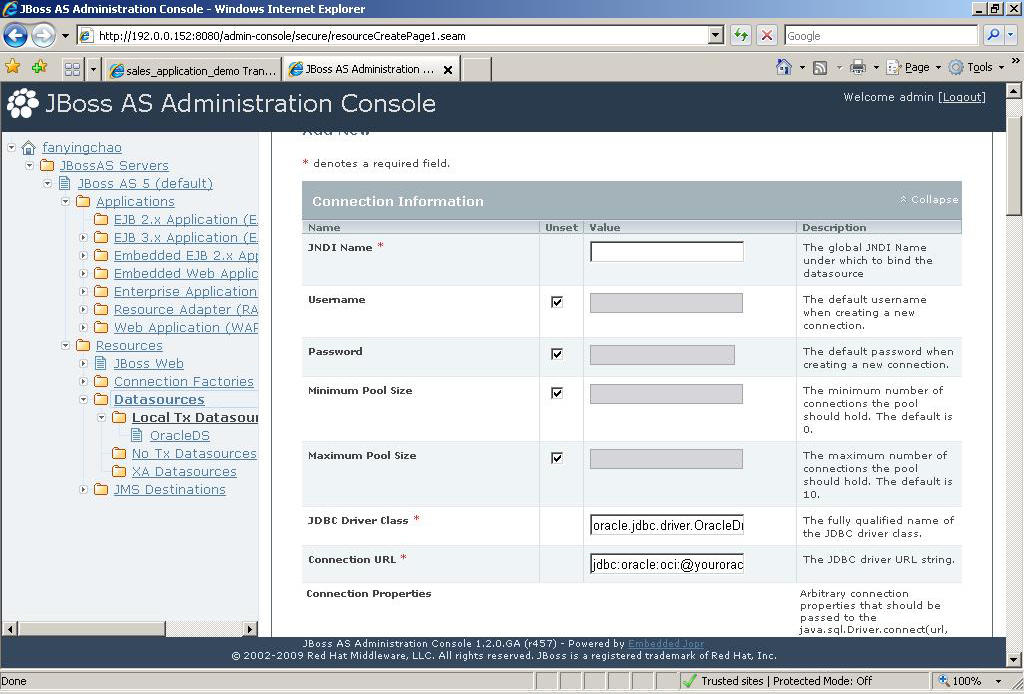
The following table describes how to specify the properties for connection information
Table 25. Datasource properties
|
JNDI Name |
Input any text as the data source name. For example, "oracle_datasource1". This name will be recognized as the data source name in AEM. |
|
Username |
Type the database login username. The username is set on the database server. |
|
Password |
Type the database login password. The password is set on the database server. |
|
JDBC Driver Class |
oracle.jdbc.driver.OracleDriver |
|
Connection URL |
jdbc:oracle:thin:@Hostname:Port:DBName for example, jdbc:oracle:thin:@192.0.0.51:1521:testing |
Step 6: In order to test the connection, please log on to Appeon AEM to configure a Transaction Object and then test it.
